
Search engines and site visitors both need clear signals about where a page sits within your site's structure. Yet many Webflow and WordPress teams ignore this until a client asks why breadcrumb yoast markup isn't showing up in search results. Whether you're evaluating CMS integrations, fixing a publishing pipeline, or rolling out RankPush across your team, getting breadcrumb navigation right in Yoast is a small but important part of technical SEO. It affects crawlability and how users move through your site. This guide walks through the setup step by step, so you can implement it with confidence and check that it works before it turns into a bigger problem.
What You Need Before You Start
Checking your Yoast SEO version
Before you touch any settings, confirm your plugin versions. Updated software avoids bugs and missing features. Log into your WordPress dashboard and check Plugins for both WordPress core and Yoast SEO. Browse examples on the latest posts page and you'll notice breadcrumb formatting can shift between plugin versions. Staying current matters.
Reviewing your site's category and taxonomy structure
Breadcrumbs reflect your site's structure. Messy categories create confusing, illogical breadcrumb trails for visitors. Take time to map things out first.
- List every category currently in use and note which ones actually get traffic.
- Check for custom taxonomies tied to specific post types, like product categories or resource tags.
- Identify duplicate or overlapping categories that might confuse the breadcrumb path.
- Confirm your post types are clearly defined, such as blog posts, pages, or portfolio items.
- Note any parent-child category relationships you want reflected in navigation.
Access and permissions you'll need
You'll need admin or editor access to change Yoast settings. Contributors and authors usually can't reach these controls. Confirm your login works and your permissions are correct before you start configuring anything.
Step 1: Understand What Breadcrumbs Are and Why They Matter
What breadcrumbs do for visitors
A breadcrumb trail is a small line of links, usually near the top of a page, that shows a visitor where they stand. It might read "Home > Blog > SEO Tips > Breadcrumb Guide." This tells readers exactly which category or section they landed in, without any guesswork.
Visitors use breadcrumbs to backtrack. Instead of hitting the browser's back button several times, they click one level up and explore related content. This matters most on sites with deep folder structures, like blogs with many categories and subcategories.
Picture a shopper browsing a clothing site. Breadcrumbs let them jump from a specific product back to the full category page in one click. That small convenience keeps people around longer.
How breadcrumbs help search engines understand your site
Search engines rely on site structure to understand how pages relate to each other. Breadcrumbs act like a map, showing which pages sit under which categories. This helps crawlers index content more efficiently and grasp the hierarchy at a glance.
Google often displays breadcrumb paths directly in search results, replacing long URLs with clean, readable trails. This can make listings more clickable. For a closer look at how markup and icons appear in real setups, check the testing icon guide dev fixture. It shows practical examples worth reviewing.
Breadcrumbs reduce bounce rate and improve navigation
When visitors feel lost, they leave. Breadcrumbs stop that by offering a clear path back to familiar ground. This small feature can lower bounce rate significantly on content-heavy sites with dozens or hundreds of posts.
Many local businesses with service pages, blog archives, and product categories see fewer exits once breadcrumbs go live. Visitors explore more pages per session, and that signals healthy engagement to search engines too.
Step 2: Learn What Breadcrumb Yoast Adds to Your Site
What the Yoast breadcrumb trail looks like
Once activated, Yoast builds a simple text-based trail near the top of each page. A typical post might show "Home > Category > Post Title," with each earlier item linked back to that section. This gives visitors a quick visual map of where they landed on the site.
The default styling is minimal. Yoast uses plain text with a separator, often a slash or arrow, between each level. There are no icons or colors by default. Many site owners adjust the separator and font through custom CSS to match their theme, but the underlying structure stays the same no matter how it looks.
You can read more on the about page for background on how this demo site tests similar navigation elements across different platforms.
How Yoast decides which category to display
Yoast picks the primary category you assign to a post inside the Yoast metabox. If you never set one, it defaults to the first category WordPress recorded, which is often not the most relevant one. This matters because the breadcrumb trail mirrors that chosen category exactly.
For pages, Yoast follows the actual page hierarchy set in the page attributes panel. A child page nested under a parent will show that parent in its trail automatically. No manual configuration is needed there, since WordPress already tracks that structure.
Structured data Yoast adds behind the scenes
Behind every visible trail, Yoast quietly inserts schema markup using JSON-LD format. This tells search engines the exact path and hierarchy of a page, separate from theme-generated breadcrumbs that often lack this coding entirely. Search engines use this data to build the breadcrumb display shown in search results.
This structured layer is why Yoast breadcrumbs differ from basic theme versions. Theme breadcrumbs usually render HTML only, with no schema attached, leaving search engines to guess the page structure on their own.

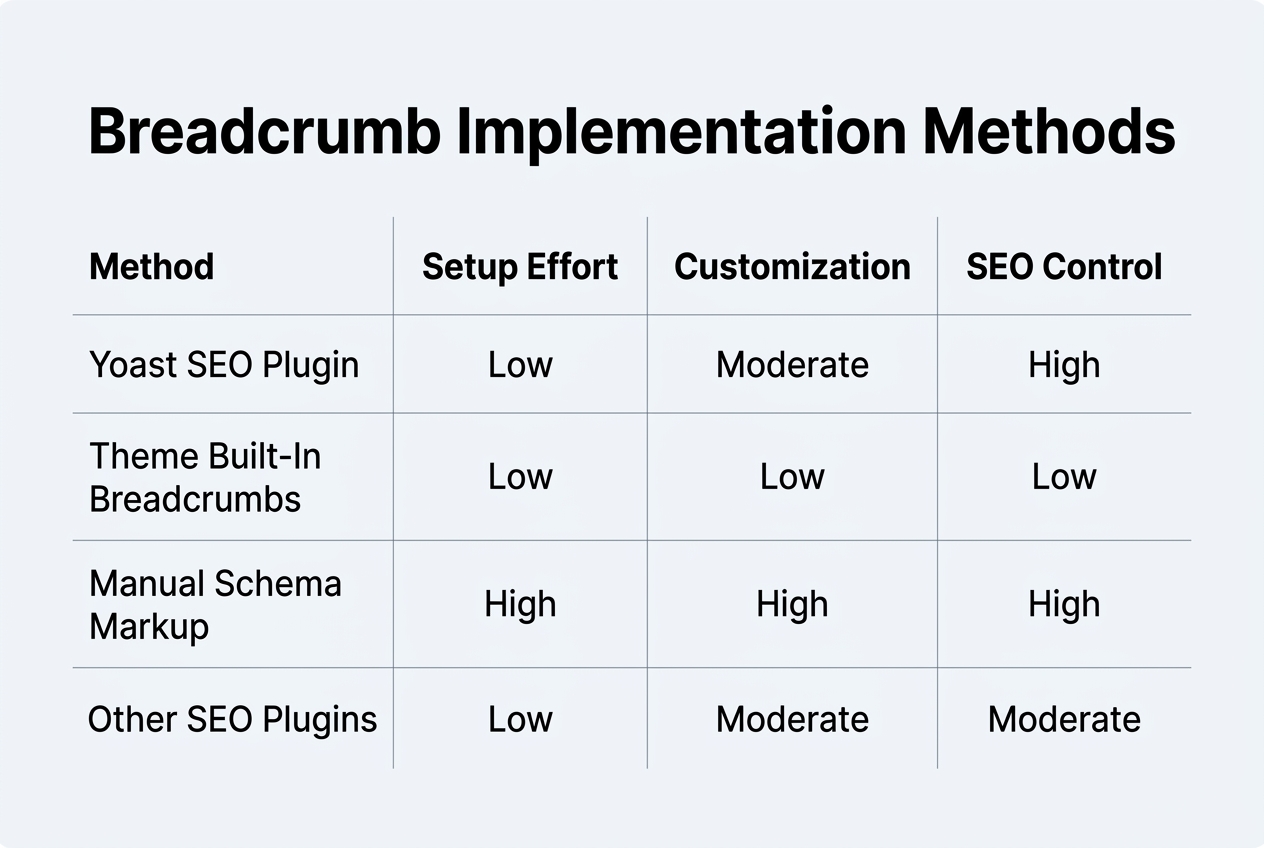
Step 3: Compare Breadcrumb Implementation Methods
Once breadcrumbs are enabled, you must decide how to display them. Three common methods exist: editing theme template files, using a block editor block, or inserting a shortcode. Each option fits a different skill level and site setup. For official guidance on the underlying function, see How to implement Yoast SEO breadcrumbs before choosing a method.
| Method | Best Use Case | Skill Required | Setup Time |
|---|---|---|---|
| Theme template code | Site-wide consistency across all pages | Advanced (PHP editing) | 15–30 minutes |
| Block editor block | Single pages or posts needing quick placement | Beginner-friendly | 2–5 minutes |
| Shortcode in classic editor | Older themes or legacy content workflows | Intermediate | 5–10 minutes |
Site-wide theme template implementation
This method edits theme files directly, adding a PHP function to header or template files. It works well for developers managing many local businesses' sites, since breadcrumbs appear everywhere automatically once added.
Block editor breadcrumbs block
The block method drops a breadcrumbs block into any page using the block editor. It suits marketers who want fast results without touching code.
Shortcode method for classic editor
The shortcode method inserts a small code snippet into post content. It's a practical bridge for sites still running the classic editor.
Step 4: Enable and Configure Breadcrumb Settings
Locating the Breadcrumbs settings panel
Open your WordPress dashboard and find the Yoast SEO menu in the sidebar. Click into it, then look for the Search Appearance section. Inside Search Appearance, you'll see several tabs across the top of the screen, including Content Types, Media, and Taxonomies.
The Breadcrumbs tab sits near the end of that row. On smaller screens, it may collapse into a dropdown menu, so check there if you don't see it right away. Click it to open the full settings panel.
This panel controls every visible detail of your breadcrumb trail. Before changing anything, scroll through once to see the current defaults. Most fresh installs ship with breadcrumbs disabled, which is why this step matters before moving further.
Turning on breadcrumbs and setting basic options
At the top of the panel, you'll find a toggle labeled Enable Breadcrumbs. Switch it on. This single action activates the underlying code Yoast needs to generate breadcrumb data across your pages.
Next, set the separator symbol between links. Common choices include a slash, a greater-than arrow, or a simple dash. Pick something that matches your site's visual style and stays readable on mobile screens.
You'll also choose whether to show the blog name as the first item, add bold styling to the current page, or hide breadcrumbs on the front page entirely. For a deeper look at fine-tuning these choices, this guide on Yoast Breadcrumb Customization: Clean Up Your Trail for ... covers practical adjustments many local businesses overlook.
Naming conventions for home, blog, and error pages
Yoast lets you customize the anchor text for your homepage link, often shortened to "Home" instead of your full site title. Keep it short. Long labels crowd the trail and look cluttered.
For the blog or archive prefix, many site owners use "Blog" or "Articles" to match their navigation menu wording. Consistency here helps visitors recognize where they are.
Finally, set a prefix for error pages, such as "Error 404:" This appears before the page title when someone lands on a broken link, giving them context without confusion.
Step 5: Configure Breadcrumbs for Post Types and Taxonomies
Setting breadcrumb rules for post types
Each post type needs its own breadcrumb logic. A blog post behaves differently than a landing page or a custom post type like "Case Studies." Check the settings for each type before publishing content live.
Choosing the primary taxonomy for posts
Posts with multiple categories need one taxonomy marked as primary. This tells the plugin which path to show in the breadcrumb trail. Without a primary taxonomy set, the system picks the first category alphabetically, which often creates confusing paths for readers.
Managing custom taxonomies and archives
Custom taxonomies, like "Industry" or "Content Type," require manual mapping. The table below outlines common setups seen on demo sites testing automated publishing workflows.
| Content Element | Breadcrumb Source | Default Behavior | Recommended Fix |
|---|---|---|---|
| Blog Post | Primary Category | Uses first assigned category | Manually set primary category |
| Case Study (custom type) | Custom Taxonomy | Falls back to post type archive | Enable taxonomy-based path |
| Product Page | Product Category | Shows generic "Shop" label | Assign specific subcategory |
| Tag Archive | Tag Taxonomy | No breadcrumb shown | Add filter for tag archives |
For tricky edge cases, developers often reference community discussions like Yoast SEO breadcrumbs: how to create a filter that uses t… when default taxonomy logic doesn't fit a site's structure.
Step 6: Add Breadcrumbs to Your Theme Site-Wide
Adding the breadcrumb code snippet to your theme
Yoast generates a PHP function that outputs the breadcrumb trail. You need to paste this function into your theme file, usually right after the opening body tag or above the main content area. Open your theme editor and find header.php or a similar template file.
The function looks like yoast_breadcrumb('<p id="breadcrumbs">','</p>');. Wrap it in a conditional check so it doesn't throw errors on sites without the plugin active. This small safeguard stops a broken page if the plugin gets deactivated later.
If you use Beaver Builder, the process is a bit different. Follow the guide to Add Yoast breadcrumbs to your site for exact file paths and hook placement. This avoids guesswork and cuts the chance of a fatal error.
Adjusting CSS for spacing and separators
Once breadcrumbs appear, they often look cramped or plain. Target the #breadcrumbs ID with custom CSS to add padding, adjust font size, and set a color that matches your brand. A common starting point is 14px text with 10px vertical padding.
Separators matter too. Yoast defaults to a "»" symbol, but many sites swap it for a simple slash or arrow. You can change this inside the breadcrumb settings panel, then fine-tune spacing around it with CSS margins so the trail doesn't feel cluttered.
Verifying breadcrumbs render on all page types
Check every template type after adding the snippet. Visit a blog post, a category archive, a product page, and a static page. Each should show a logical, clickable trail back to the homepage.
Look closely at edge cases like search results pages or 404 templates, since these sometimes get skipped during theme edits. Confirm mobile display too. A consistent breadcrumb trail across all templates signals a clean, finished implementation.
Step 7: Add Breadcrumbs Without Editing Theme Code
Not every site owner wants to touch template files. Yoast SEO offers two no-code paths that work well for editors and non-developers managing individual pages.
Inserting the Breadcrumbs block on a single post
The block editor includes a native Yoast SEO breadcrumbs block. Search for "Yoast Breadcrumbs" in the block inserter and drop it wherever you want the trail to appear, usually just below the title. It pulls live settings from your Yoast configuration automatically.
Using the shortcode method in the block editor
If the block feels limited, use the shortcode block instead. Paste [wpseo_breadcrumb] into a shortcode block, and it renders the same output. This approach gives more control over surrounding spacing and layout elements.
Using the shortcode method in the classic editor
Classic editor users paste the identical shortcode directly into the text area. Consider these points before choosing a method:
- The block option requires zero code knowledge and works fastest for one-off pages.
- The shortcode method suits sites still running the classic editor or page builders that support shortcodes.
- Neither method changes your global theme files, so updates won't overwrite your work.
- Widget areas can also accept the shortcode if your theme supports text widgets.
- If you later decide breadcrumbs aren't needed, guidance like Removing Breadcrumb Schema with Yoast SEO explains how to reverse the setup cleanly.
For non-developers, the block method is the simplest starting point.
Step 8: Verify, Troubleshoot, and Maintain Your Breadcrumbs
Testing breadcrumb display and structured data
Once breadcrumbs are live, check them on the front end. Visit several pages, including deep category pages and blog posts. Confirm the trail matches your site structure. Then run the page through a rich results testing tool. This shows whether structured data is valid and readable by search engines.
Common issues and quick fixes
Most breadcrumb problems fall into a short list of repeat offenders. Work through these before assuming something is broken at a deeper level.
- Breadcrumbs show the wrong parent page because taxonomy settings weren't updated after a site restructure.
- Structured data errors appear because two plugins or scripts are both generating schema markup at once.
- Breadcrumbs vanish on certain templates because the shortcode or code snippet wasn't added to that specific file.
- Home page labels display oddly because the separator or homepage text field was left blank.
- Cached pages still show outdated breadcrumb trails because the site cache wasn't cleared after changes.
Tracking breadcrumbs in Google search snippets
Breadcrumbs can appear directly in search results, replacing the plain URL. Check Search Console periodically for structured data warnings. Search your own pages on Google every few weeks to confirm the trail still displays. Many local businesses skip this step and miss silent errors that build up over time.
Wrap-Up: Keeping Your Breadcrumb Navigation SEO-Ready
Quick recap of the setup process
Setting up breadcrumb navigation follows a clear path. You enabled the feature, configured settings for post types and taxonomies, then added the code to your theme or used a shortcode. Each step builds on the last. Skip one, and breadcrumbs may show incorrect paths or fail to render.
The order matters. Configuration comes before display. Verification comes last. This sequence stops you from wasting time chasing display bugs that were really settings problems all along. Follow it in order and you'll get a working, accurate trail on every page type, from single posts to category archives.
Maintaining breadcrumbs as your site scales
Breadcrumbs need occasional check-ins, not constant attention. Every time you add a new category, custom post type, or major site section, confirm the breadcrumb trail still reflects your actual structure. A mismatch between menu labels and breadcrumb text confuses visitors and search engines alike.
As content grows into the hundreds of pages, review your taxonomy hierarchy every few months. Flat structures that worked at 50 posts often break down at 500. Reorganizing categories later means updating breadcrumb settings again, so plan your hierarchy with future growth in mind.
Where to go next for SEO structure improvements
Breadcrumbs are one piece of a larger internal linking strategy. Next, audit your site's overall architecture. Check how many clicks it takes to reach your deepest pages, and aim for three or fewer.
Then strengthen internal links between related articles, tighten your XML sitemap, and review how anchor text supports topical relevance across the site.
If you're testing out breadcrumb structures alongside your own automated publishing setup, take a look at how RankPush Test Blog handles it — as a demo blog built specifically to trial RankPush's Webflow publishing integration, it's a great real-world example of SEO and content marketing pieces going live through an automated pipeline. Swing by the blog to see it in action, or book a quick session with us if you'd like to set up something similar for your own site.